A workflow recording records the actions taken to perform a certain task. An analyst and expert user would create the record of the "right way" of performing the task. The recording stores shots of the screen which are able to be used by the screen mapper.
This section describes the first Recording option provided with Flynet. We recommend that if you are using Flynet Studio for your development, that you instead use the Recorder 2.0 application that can be loaded from the FV Taskbar tray icon or the Flynet Start Folder.
For full details of how to use the original recorder, look in the Screen Workflow Recorder help document.
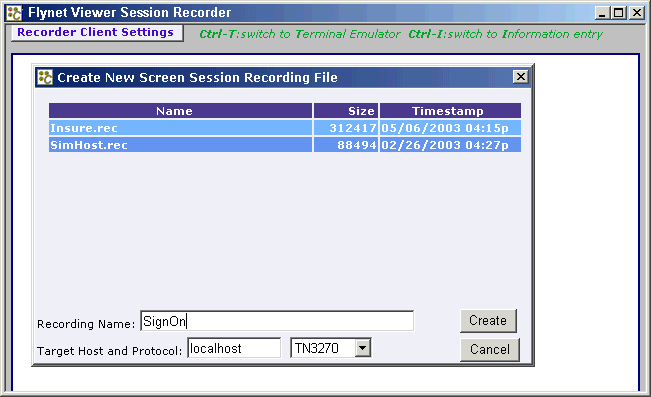
To start a recording open the "Create a new Recording" application. This can be done by using the menu option in the Admin Console, or by selecting the option from the programs list under "Flynet". When the session recorder window opens enter a name for the recording (e.g. "SignOn" as below), and click the "Create" button.

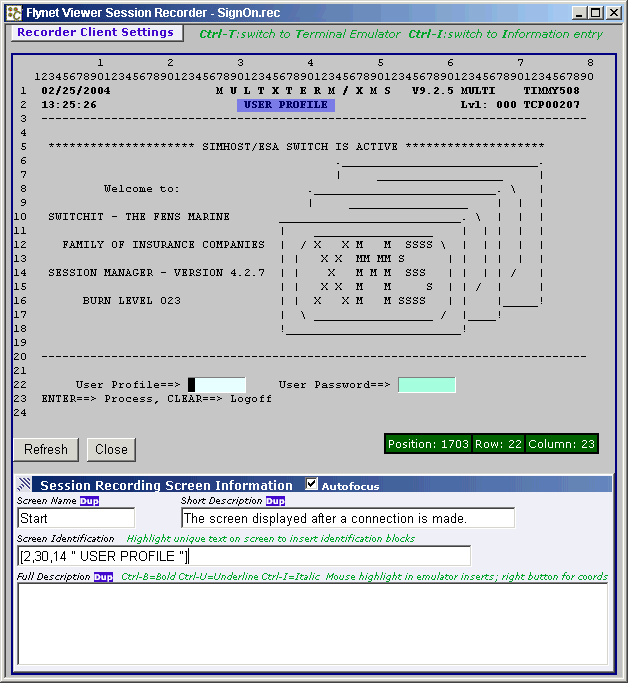
When the connection to the host has been made the recorder will show the current host screen and the session recording screen information. Enter a name for the screen name (e.g. "Start"), and the short description.
Ensure that the screen name is unique as it will be used to identify a particular screen. Please note that screens can be grouped, but that for the purposes of this demonstration things will be kept simple. For more information on grouping screens refer to the advanced topic of Screen Grouping.
Click in the Screen Identification text box to place the cursor in it. To generate the identification information highlight the section of text to identify - in this case " USER PROFILE ", with the beginning and ending spaces. The text [2,30,14 " USER PROFILE "] is automatically placed into the Screen Identification text box. If the screen requires more identification then highlight more text.
Note that this screen is the first screen received after a connection. It is generally a good idea to recognise text in the lower section of the screen to ensure that the full screen has been received. Highlight the text "ENTER" at row 23, column 2. The text [2,30,14 " USER PROFILE "][23,2,5 "ENTER"] should now be in the Screen Identification text box.
Any information required to describe the startup screen and how to move on from here can be entered into the Full Description text box.

To move on from this screen, press Ctrl-T. This moves focus away from the information entry to the emulator so that the User Profile entry can be typed. Type "simmy" and hit the ENTER key.
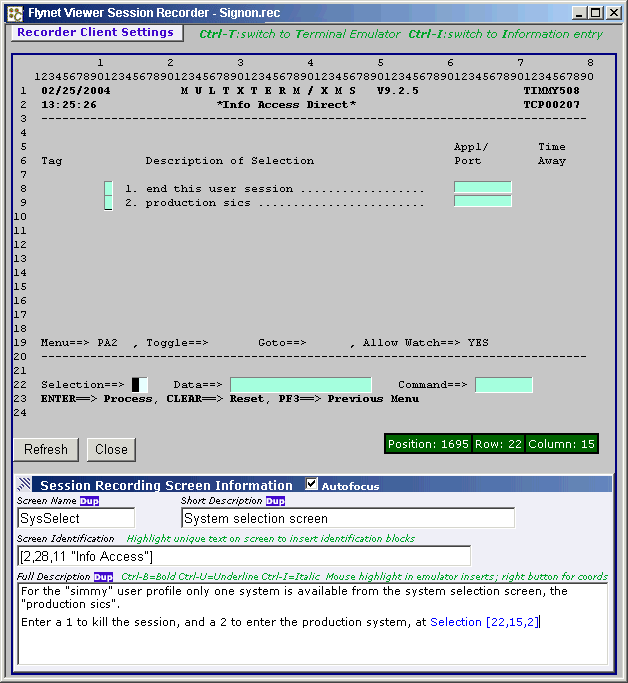
When the next screen appears give it the Screen Name "SysSelect". Enter the Short Description as below, and highlight the text "Info Access" when the cursor is in the Screen Identification text box.

When the screen has been identified and the description information entered, press Ctrl-T to switch to emulator mode. As this workflow is only to show signing on and off, type "1" and hit the ENTER key. You will be taken back to the "Start" screen. Notice that all the information typed to describe the screen remains, except for anything that may have been typed into the "Full Description" text box. This is because a screen may be visited multiple times, and each time it is visited it may be for a different purpose, thus each time a screen is visited you may enter a description for the workflow recording.
Press Ctrl-T to switch to emulator mode and press the ESC key. A popup window will inform you that the session is no longer valid. Click the OK button.
To close and save the recording, click the "Close" button in the emulator. You will be asked if you wish to close and stop the recording. Click the OK button. If the popup appears stating that the session is no longer valid then click the OK button.
The recording should be saved in the "Recordings" folder where the package was installed. It will be used in the next section, Using the Screen Mapper.
