This is a free-form, rich-text entry field. It is intended to provide commentary on how the screen is to be used within the workflow. Only include general information on the screen the first time it is encountered.
Text Formatting
Text copied using the mouse from the emulator frame is automatically coloured blue.
You can format text yourself using the following control keys:
Control-B Toggle BOLD on/off
Control-I Toggle ITALICS on/off
Control-U Toggle UNDERSCORE on/off
Documenting Screen Fields
If your description includes a reference to a field on the screen, insert a reference to it with the mouse! This is a key feature of the Screen Recorder; don't waste it. Simply use the right-mouse button and, as you are keying, swipe an area of the screen. A blue location details block will be inserted, such as: [10,3,8 "SWITCHIT"].
Location blocks are valuable information for developers, as it avoids having the "hunt" for a field, that in many cases is not labeled clearly. In the Recording Viewer, moving the mouse over a field information block highlights its location on the screen image.
Another benefit of documenting field locations is that the Recording Viewer's XML generation feature will create a FieldMap XML entity and generate Field entries for each field reference found in the Full Description field.
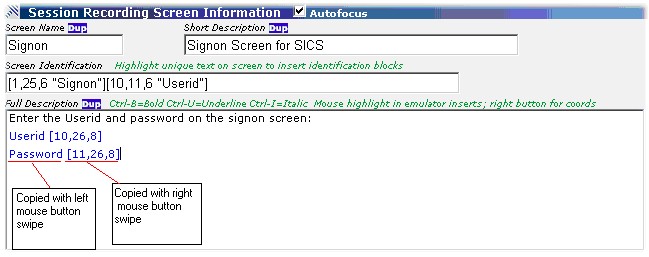
Example:
In this example, 2 field locations have been copied--note that the field names were also copied, using the left mouse button. The Enter key was pressed to add a paragraph separator between each name-location pair.
Tip: if you plan on exporting your field entries to the Screen definitions XML format, separate them cleanly and include a name to the left of each reference (so that automatic field naming in the XML generation works best)